Weird colored tub? That can be fixed!
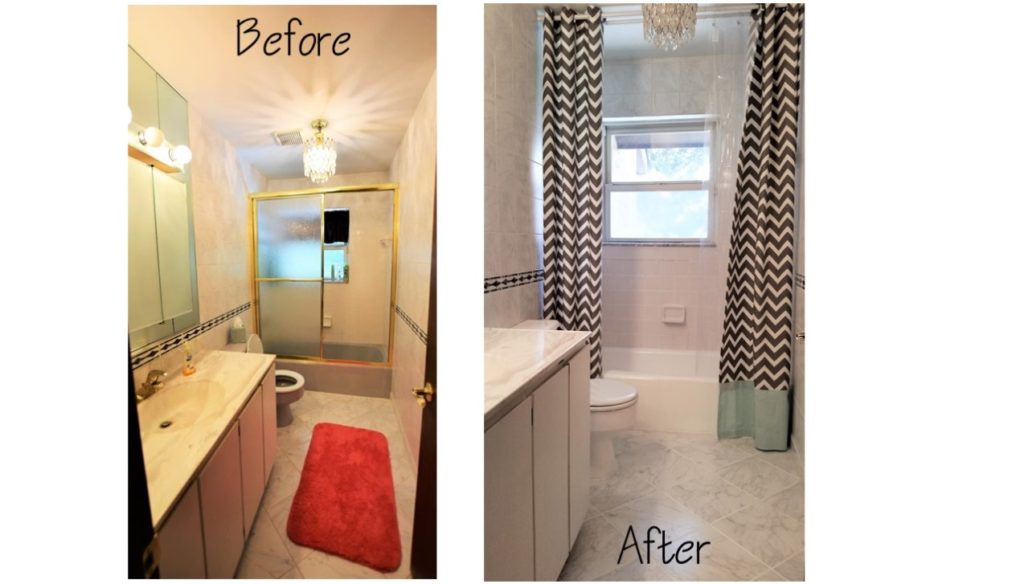
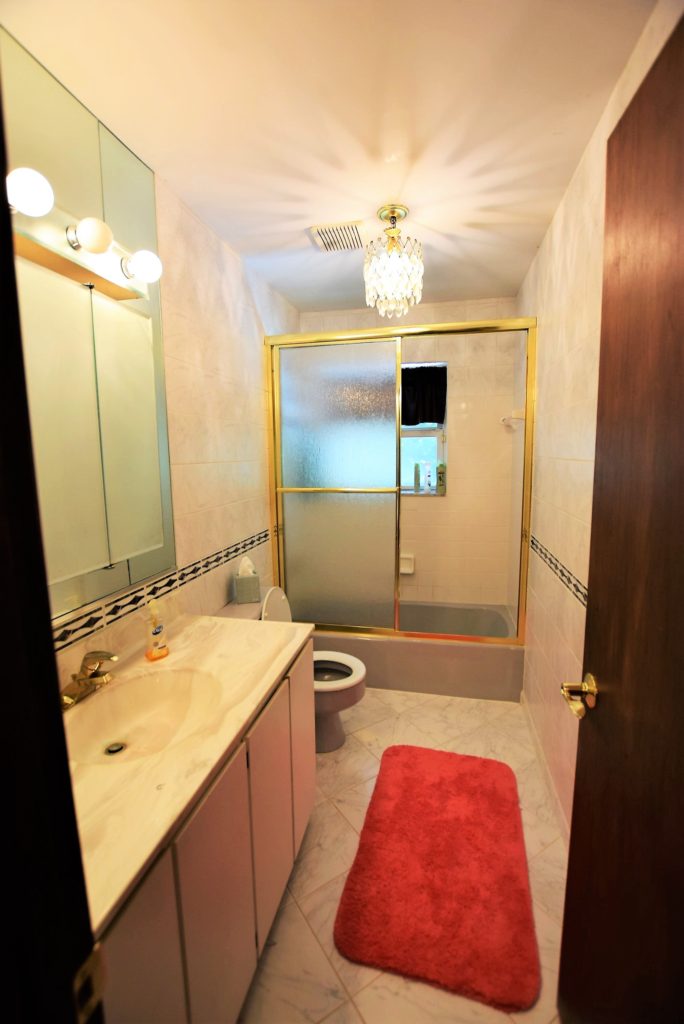
I’ve talked a lot about all the upcoming projects at my new (to me) old house but do you know where I actually started? The nicest bathroom in the house. Ok, nicest is being generous. It is the least ugly. And by least ugly, I mean Carrera look alike ceramic tile from floor to ceiling (varying sizes with a mid-wall border), white builder grade tile in the tub/shower, gold trimmed safety glass sliding shower door, crystal chandeliers (not the good kind), off white circa 1985 laminate vanity with cultured marble top, gold faucets, and a grey tub and toilet. I thought I could work with the tile, especially because I was not relishing the idea of demoing then re-drywalling the entire bathroom, but the rest was gonna have to go. First up – a makeover was in order for that tub and toilet. You really don’t see many colored toilets or tubs in new homes, they are almost always white or occasionally off-white. Even though our grey tub wasn’t as offensive as a mustard yellow, avocado green or, gasp, a burgundy tub, any color other than white just screams “dated!”
The Plan
Since I had no plans to totally gut this bathroom Plan A was to try and coat the tub in one of those specially formulated epoxy based paints for tub and tile. If it failed, then Plan B would be to rip out the tub and toilet. I’d heard good things from others who had done this project and read mixed reviews online but still felt it was worth a shot to potentially save over a thousand dollars and the sweat equity involved in replacing the tub and toilet.
Materials
I first checked my local Home Depot and Lowe’s but both only carried a brand of tub coating that got terrible reviews. I bought Rustoleum Tub and Tile Refinisher (2 kits) on Amazon and it was at my house in 2 days.
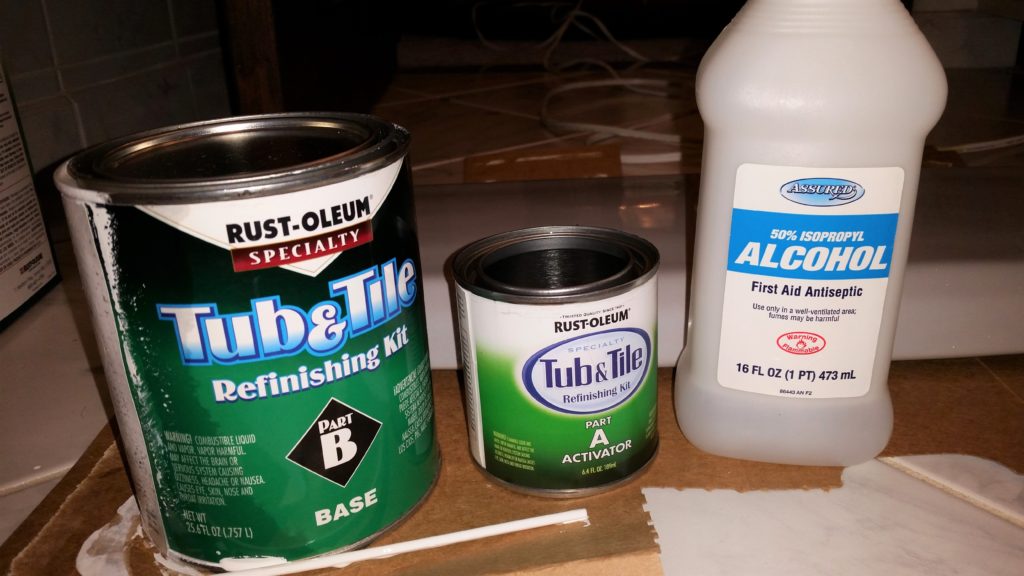
Other supplies I used included:
- Fine grit sandpaper
- Mask, rubber gloves
- Calcium Lime and Rust (CLR) cleaner
- Bleach-based cleaner
- Alcohol
- Caulk remover tool or razor blade
- Mini paint roller for smooth surfaces
- Blue painter’s tape
- Tack cloth
- Screw driver
- Drill
How to Paint a Tub (or any other ugly bathroom surface)
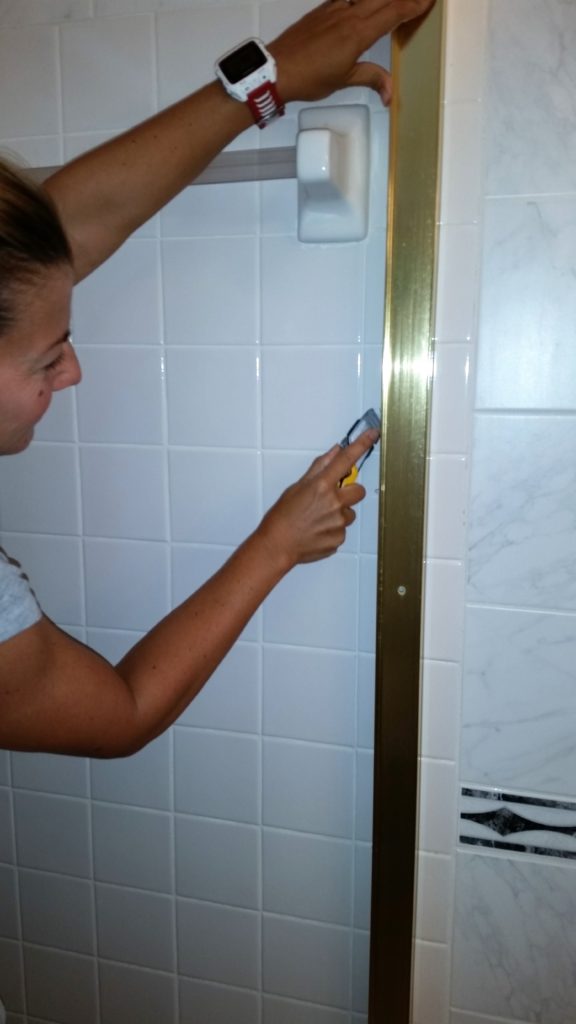
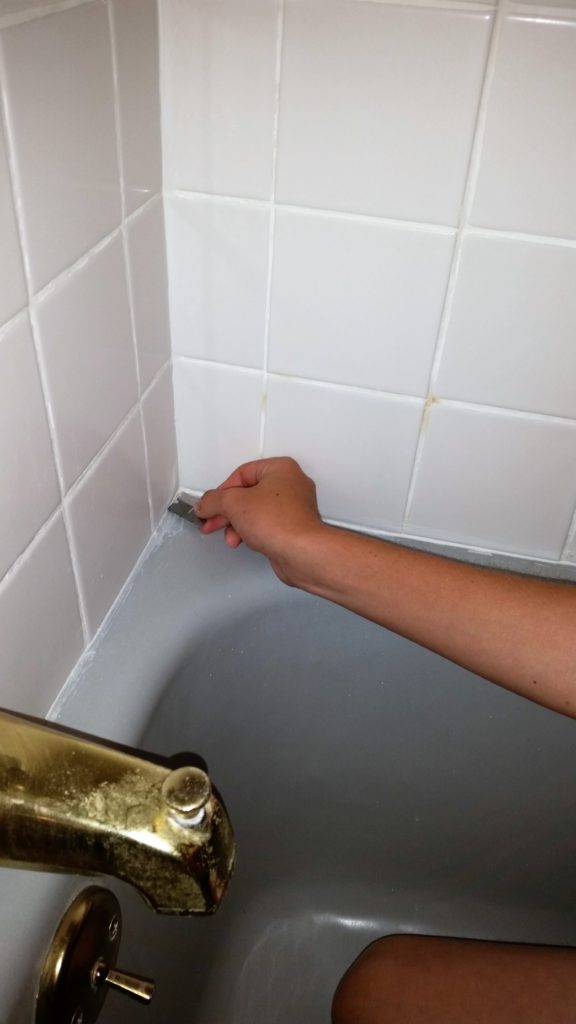
First, I removed the gold shower doors and track. I planned on putting up a shower curtain afterwards. After they were unscrewed, I had to remove excess silicone from the tub lip and tile with a razor blade. I also went back later and filled the holes where the track had been screwed into the tile with white caulk. I also removed all the caulk between the tile and the tub and unscrewed the little brass drain doo-hickey. I didn’t bother removing the toilet handle deciding to make it white since most toilet handles these days are the same color as the toilet anyway. The toilet already had a new-ish white seat on it so I removed that.
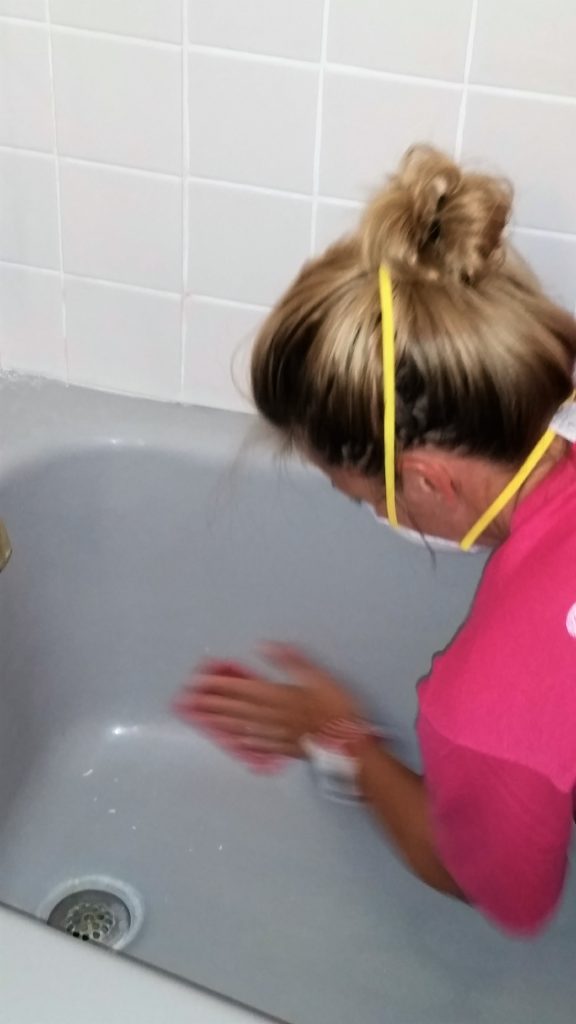
With the doors out of the way, I gave the area in and around the tub and toilet a really thorough cleaning with a bleach based cleaner in a lame attempt to remove lots of mildew and other nasty stuff.
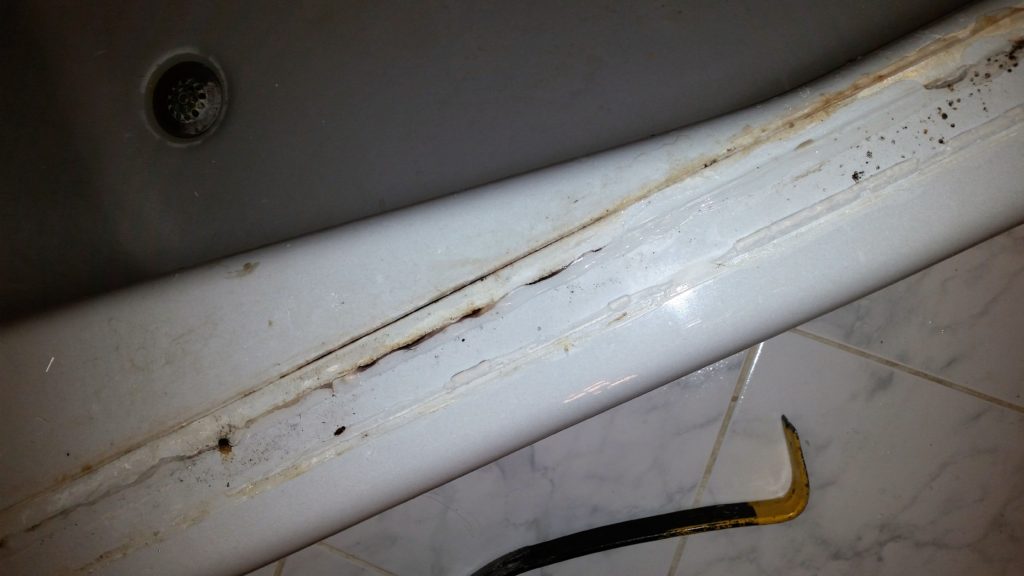
This left me better able to see any other remnants of caulk or silicone that had to be removed around the entire tub.
Still there is a set of about 6 tiles with brownish yellow grout that I just could not get cleaned that will get new grout once I do other tiling, but these didn’t concern me too much since I didn’t want to paint the tile, only the tub and toilet.
Next, I cleaned the tub and toilet with CLR. This was especially important because we have well water which generally has more minerals in it than city water and can leave residue on your tub. Regardless of your water source, do this step anyway. Your tub can’t be too clean for this process. Note, CLR, when used in a small space has fumes so wear a mask, open a window and turn on your bath fan for ventilation.
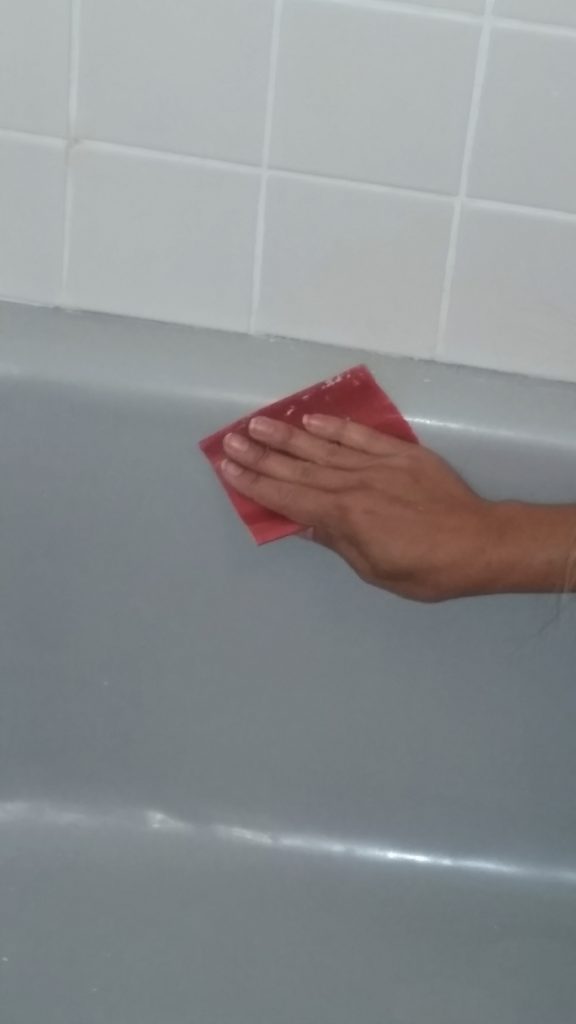
After everything was clean, I sanded the tub and toilet with very fine grit sandpaper. I used a 400 grit. Then I rinsed with water, dried it, sanded and rinsed again.
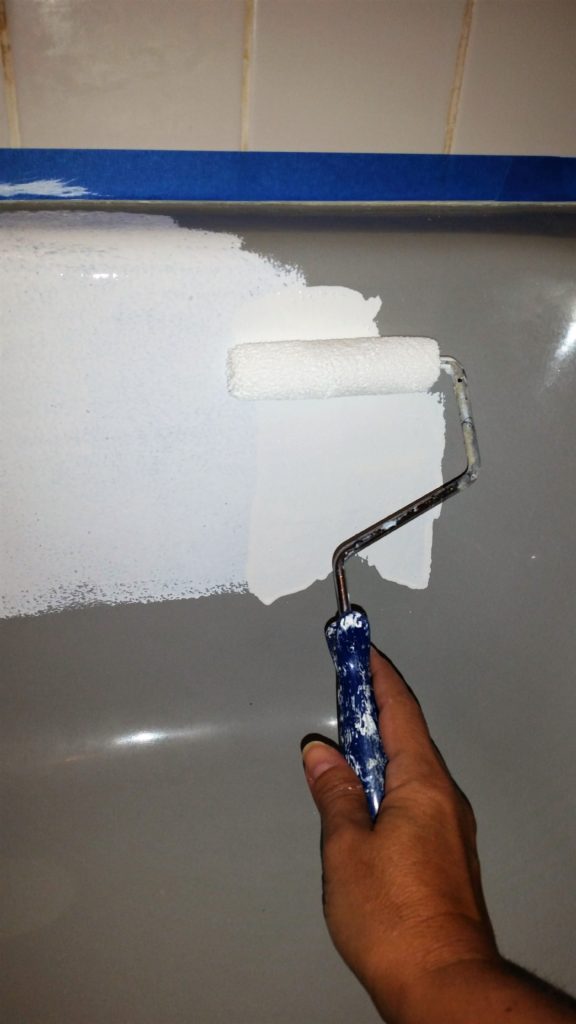
Once everything is totally dry and dust free you are ready to paint. It’ll be important to assess where you are in the process before you commit to painting. The special paint is an epoxy that comes in 2 parts. Once it’s mixed it must be used in 6 hours, after that it thickens to the point where it’s unusable. I opted to come back the next day ready to paint.
I began day 2 by taking a tack cloth and running it over every surface to be painted to pick up any lint, dust, hair, and small particles that somehow magically appeared overnight. The surface must be perfect to accept the paint. I taped off the adjacent areas that weren’t going to get paint with blue painters tape.
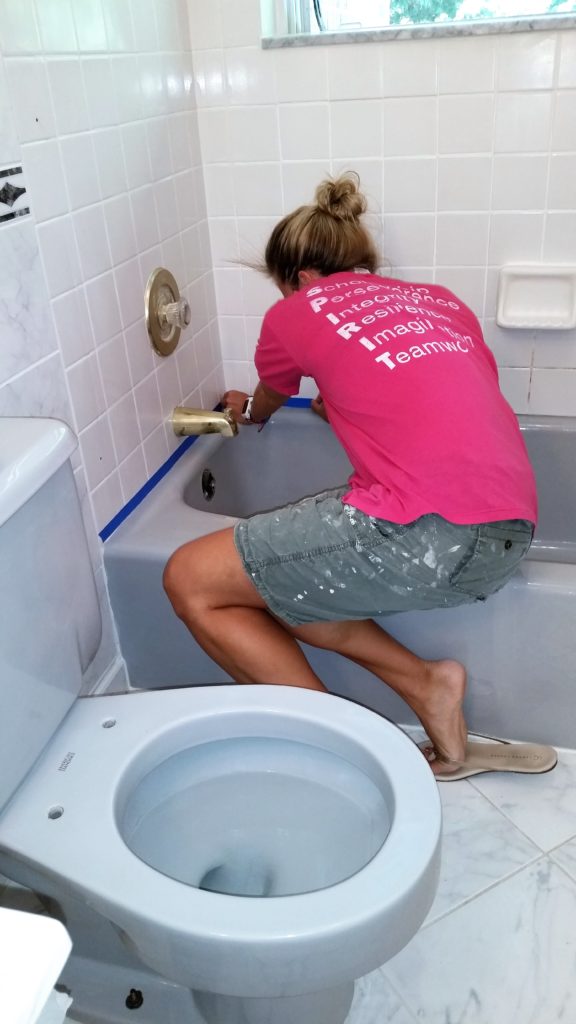
I followed Rustoleum’s directions and poured the contents of one container into the other and mixed them. The odors from this paint are noxious! Definitely wear a mask, open windows and put a fan or two on. No matter what you do it will permeate the whole house and linger for days, it’s that strong. I filled a disposable pan with some paint, soaked a fine nap roller made for smooth surfaces and started rolling. As advertised, the paint has unique self leveling properties… to a point. It is runny and will drip if you use too much so it’s better to use many thin coats rather than glob it on. Nobody wants a drippy tub. This stuff dries pretty quickly so if you find yourself overlapping an area you already did 5 minutes ago it may get tacky and not re-level so be careful of that.
I also noticed in areas where there once was silicone holding the door on it still didn’t adhere to even after scraping the silicone off, cleaning and sanding. In hindsight perhaps maybe using acetone might remove this residue, who knows? But since I had already started it was too late. I used the small foam brush in the corners where the tile met the tub and where the toilet met the floor. I removed the lid from the toilet tank so that I could cover the entire thing and also the tank itself. Now here’s where you might be wondering what I did inside the bowl which was also gray. I suppose I could have been all thorough-like and taken the toilet bowl water out in cupfuls then soaked up the last bits in rags, but nope, I didn’t. I just left it gray. And you might notice if the seat’s up and your looking right at it (sorry boys), but otherwise the eye is fooled into thinking it’s a shadow… at least that’s what I’m telling myself. I was honestly a little paranoid about screwing the inside of it up then having to rip the toilet out altogether, which wouldn’t normally be a big deal but some moron grouted, yes, grouted the toilet to the floor – ugh.
Anyway, 2 coats later and I could still see gray through, so I knew I was definitely doing a third. I decided to wait until the next day for more complete drying. I used what little I had left in my paint pan to cover a nasty looking fiberglass slop sink in my laundry room.

This thing was so gross I wouldn’t have cleaned an old paint brush in it let alone laundry delicates (who am I kidding, I wash NOTHING by hand). Anyway, the slop sink looks brand new now. In between days 2 and 3 of this project is where I made my most critical mistake. I learned an old trick a few years ago that if you’re painting project will take you the course of several days then you put your brush or roller in a plastic bag, wrap it up tight and stick it in the fridge and the next time you paint it’s still perfect and fresh, not at all gunky or dried up. It can save you a ton of time cleaning brushes. Whatever you do DO NOT PUT THIS (or any epoxy, shellac or varnish based paint) in your fridge. Certain foods are very susceptible to odors and flavors that may escape the wrapped brush or roller and totally ruin your food. I learned this the hard way. I had an English Muffin the next morning with a little epoxy-butter. Yech. Butter itself isn’t healthy but chlorofluorocarbon laced butter is most certainly even worse for you.
On day 3 of the tub project I mixed the second set of cans together to do coats 3 and 4 on the tub and toilet. (WARNING! Many a YouTube video will make this whole project look like it’s complete in mere hours, not days. Lies…all lies…unless one has nothing better to do that literally sit around and watch paint dry.) Anyway, after the third coat the silicone residue area on the rim of the tub was starting to get covered and accept the paint. With a 4th coat the paint was fully covering this area and for good measure I gave just this area a 5th coat.
I still had some paint left over so I racked my brain about what else I could epoxy-paint. And then, an epiphany! What is the bane of every awesome looking kitchen or bath that at some point WILL definitely go down the tubes and look like crap? Yep, the grout. I dunno what’s in that grout sealer they sell but I am convinced it’s a racket. Grout never stays clean. So it remains to be seen if this will last or not but I decided to paint the grout in between the bathroom floor tiles. Figured it couldn’t be any worse than the dingy dirty gray-brown that currently flanked the bright white and grey tiles. It was a bit tedious taping off each tile, but it seriously turned out better than I expected.
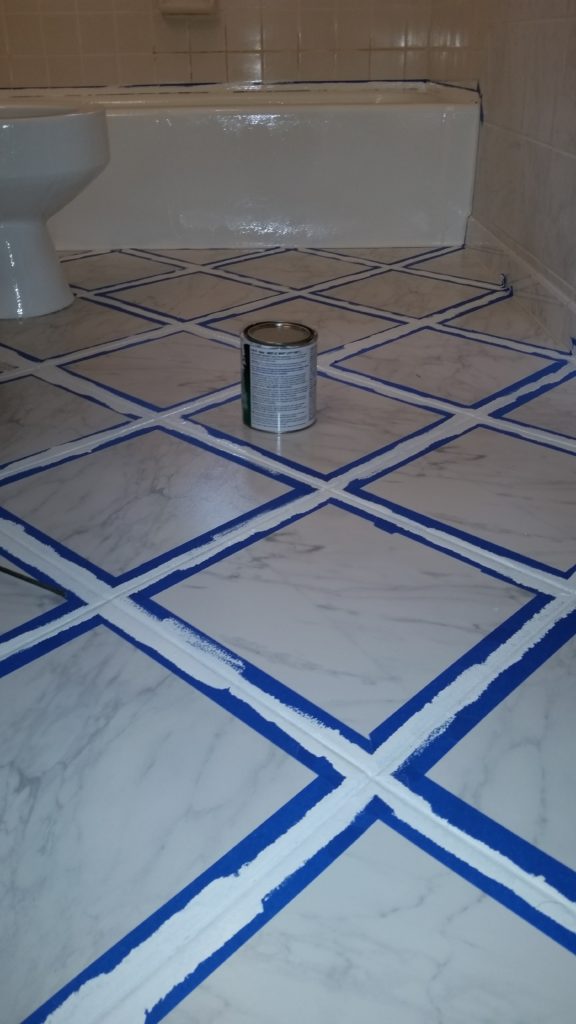
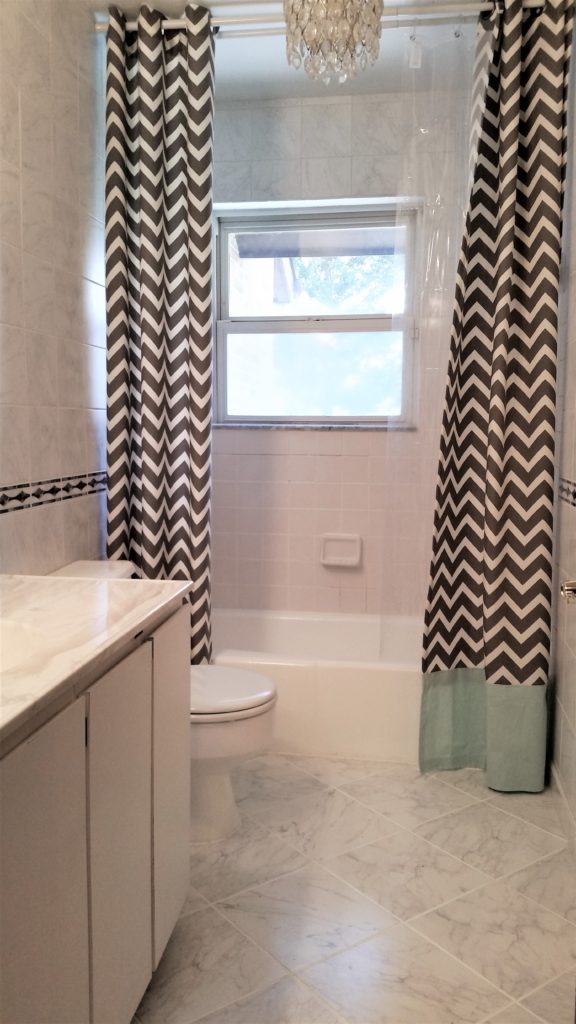
I did 2 coats. All of the tub and tile paint has to cure for at least 72 hours before it can get wet and sustain foot traffic. I waited that long before I put back the toilet lid, the drain thingy, then I hung 2 tension rods at the ceiling one for a liner and one for my extra-long shower curtain. Hanging your shower curtain at the ceiling makes the room look taller! And yes, I know, I know the chevron print shower curtain is soooooooo 2016, but I had it leftover from my last house. I’ll change it when I update the rest of the bathroom.
Results
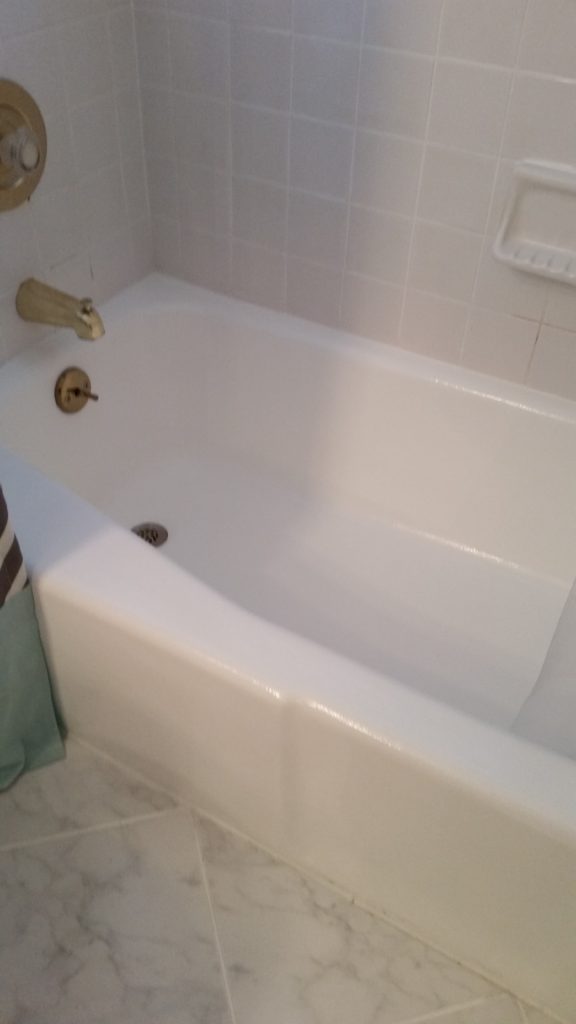
It’s been almost 5 months since I painted the tub, toilet, laundry sink and tile grout and it all still looks great! Admittedly the finish isn’t as smooth as a regular tub, it’s a little dimpled, sort of like an orange peel, but it looks 100% better than having a dated bathroom ensemble. In the near future I’ll rip out the huge mirrored cabinet, fill the empty wall spaces left with remaining tile, and switch out the vanity and fixtures for something more current. So I’d not consider this photo a true “after” shot, but rather an interim. Now that we’re deep into the kitchen remodel and basement demo, it should only take me …. meh…. 3 years or so to get back to this project. Who’s hanging in there with me?