Easy Board and Batten Project for Under $200!!
So as many of you may know, I own a vacation rental property in the Outer Banks of North Carolina. (And you can read all about our adventure embarking on a vacation rental here). Is it wonderful owning a beach house? Yes, it is. It is a sanctuary for my family. Is it ALL bliss though? No, it’s not. Wait. Why, you ask? Because our dream home is rented out to folks who mostly don’t take care of it and don’t worry about damaging or breaking anything, and, in a way, I can’t blame them, they are on vacation. They aren’t worried about spilling sticky stuff down the front of the cabinets, cleaning the crusty stuff off the grill or dinging the walls as they roll their suitcases down the hall. After a season of rentals, I often feel like crying as I wander the house assessing the last 4 months of “wear and tear.” Occasionally, there are issues that take a professional intervention. For example, we recently had to have sensors installed on the exterior doors that turn the HVAC system off when the doors are open. When renters leave the doors open while the AC is running, then hot, moist air from outside colliding with cool dry air inside, not only creates monster electric bills, it also creates excess humidity and potentially mold in the house. Thankfully though, most renter rigors can be fixed pretty easily (magic erasers are a wonderful thing). In the 3 years since our rental had been built, I was continuously either magic erasering or repainting our 2nd floor hallway because it got a lot of abuse from things banging against it; suitcases, laundry baskets, coolers, you name it, it’s apparently bounced off the poor flat-painted walls of this hall.
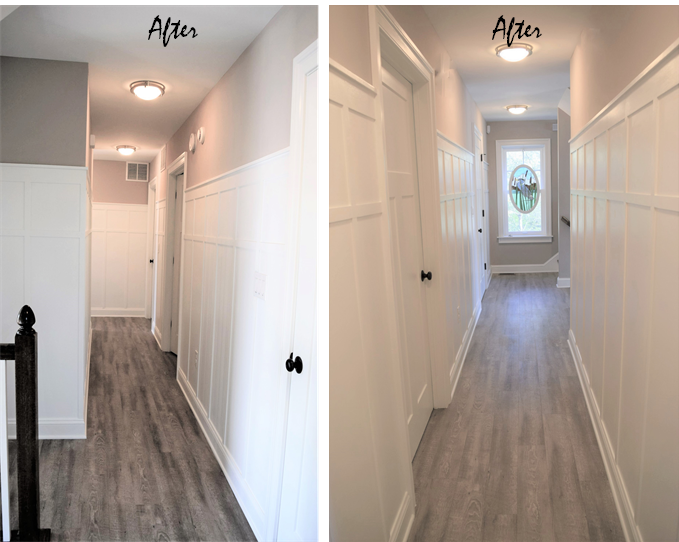
Hallway Before Board and Batten

This past week was spring break and my family and I headed to the beach for some home maintenance and relaxation. (While projects may not sound fun to most people, I have trouble sitting still, so I need a home project to relax). I decided to create a board and batten wall down the hallway in the hopes that the finish (being a semi-gloss, interior trim finish) would stand up to the scuffs and scrapes better than ‘ol flat paint, and easier to wipe off.
DIY It!
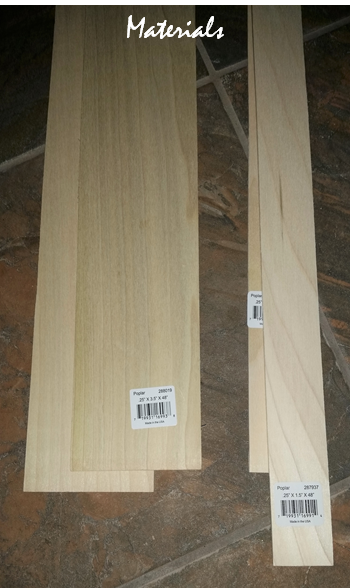
First step, after scouring Pinterest for ideas of course, was to measure the walls and acquire the materials needed for the project. We already had decorative baseboard which we wanted to keep. The baseboard stuck out a ¼” from the wall, so we were looking for a material with ¼” thickness that wasn’t too expensive and wouldn’t require too much sanding and finishing. We found everything we needed at Home Depot…in Virginia… apparently our local beach Home Depot didn’t carry this same material, so we bought it in VA and schlepped it all the way to NC.
We used the following materials and equipment:
48” x 1.5” x ¼” vertical battens
48” x 3.5” x ¼” top horizontal battens
6’ x 1” x 2” top caps ripped in half lengthwise (since we didn’t want anything to stick out too far)
Brad nails
Brad nailer and compressor
Measuring tape
Level
T-square or Triangle square
Wood filler and putty knife
Sand paper
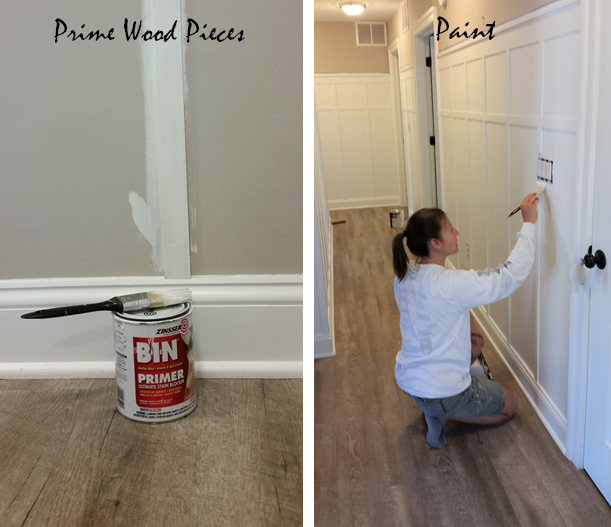
BIN Primer
Sherwin Williams SuperPaint Interior Latex Semi-Gloss (The color is untinted white since the rest of the trim in the house was already this color).
Paint Supplies (brushes, rollers, tape etc)
Paintable caulk & caulk gun
Construction adhesive (note we didn’t glue & nail, just nailed, but in hindsight, it may have been a bit sturdier to do both, I suppose time will tell).
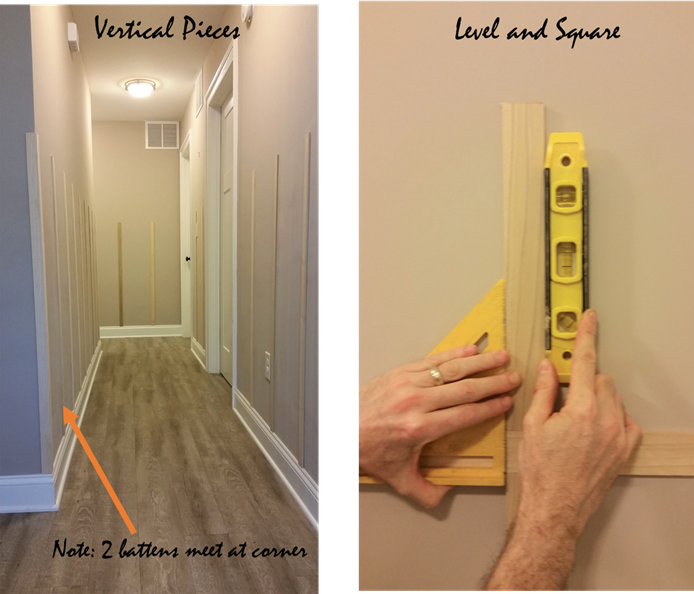
We began by measuring the walls, and determining the pattern in which we wanted to do board and batten. There are multiple variations; some with wide boards, some with thin, some with a top cap, some without. Whichever one you want to do is fine but definitely design first, construct second, winging it is not recommended. After we determined the height of our board and batten and we measured the longest / most prominent wall and determined how frequently we wanted the vertical boards to repeat in a way that we wouldn’t end up with a weird partial batten at a corner. For us, this was about 14” apart. On all other walls, which were either broken up by doors or shorter in length, we first laid the boards out at 14” apart and if they created a weird space we “fudged” the 14” pattern into 13” or 13.5” or even 14.5” apart so that all battens were visually appealing and well-spaced on all walls in this hall.
We leaned each vertical batten in the approximate area where it would get nailed to the wall. We nailed the first batten in at the edge of the hallway corner on the “main wall”, we measured for accuracy, held the level up against the batten to ensure it was level from top to bottom (nothing worse than crooked battens). Note this works best with two people, one holds and wields the nailgun while the other measures and levels. Did each 48”x 1 ½”x ½” on all walls first.
Then we levelled and nailed on these same boards in a horizontal fashion across the top. Next, we cut more of those same boards into 12” sections to make the next vertical pieces.
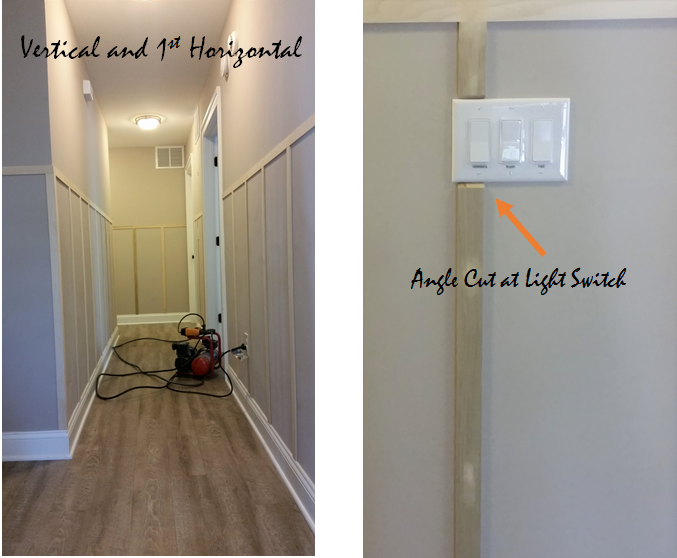
We repeated the levelling and nailing process (which is easier with pieces that are only a foot long). Finally, we placed, leveled and nailed on the 3.5” boards horizontally across the top and topped it off with a little ledge or top cap.
Already with just the wood up I was liking how it made the hallway instantly more interesting. Next came the boring, messy parts. All gaps, joints and nail holes have to be filled with wood putty and sanded smooth. This creates a mess. In a space as confined as this we ended up setting off the smoke detectors with dust, and then forgot that our system there was connected to the fire alarm, and since we don’t live there all the time it took us a while to remember the code to shut it off. We used the caulk to fill in any long vertical or horizontal gaps between the wall and the battens. If you miss any or think that some gaps are too small to merit caulk, wait until you have a coat of paint up and if you see black space among white boards, you need more caulk.

After all gaps and holes are filled, sanded and dust wiped off its time for priming and painting. Note this post is not sponsored in any way, but the ONLY primer I have found that covers up wood knots and prevents the yellow-ish seepage of wood juice (there has got to be a better term for that) through paint is a primer called BIN. This stuff is pricey, but awesome. It’s surprising, because it’s milky in consistency and goes on thin, dries fast and will need 2 coats, but it does its job. It’s really only necessary to apply this to the wood parts of the wall. After priming and letting it dry overnight, I added 2 coats of semi-gloss paint. I used a brush on all wood parts and a roller on the wall portions. In hindsight it may have been helpful to paint the walls prior to putting up the wood or to use a foam roller as that gets in nooks and corners better than a large roller. Since the board and batten is technically a trim, it looks best in a semi-gloss finish.
What a Difference!
The project took 1 long weekend to complete and we spent about $200 in materials, and what a difference! I can only hope that it will make cleaning up after scuffs and dings easier, or at least less noticeable. Already I like how the amount of white in the hallway makes the area seem larger and brighter than just the plain greige paint. Hmmm, if this works maybe I could continue it up the 3 flights of stairs too?